
还记得调试数据流管道就像在证据不断移动的犯罪现场玩侦探游戏吗?现在,拿起你的放大镜,因为我们将把你变成流媒体世界的夏洛克·福尔摩斯。在我们介绍了 Debezium 与 OpenLineage 的集成 后,是时候卷起袖子,深入进行一些真正的侦探工作了。我们将构建一个完整的订单处理管道,使用 Debezium 捕获数据库更改,通过 Apache Flink 处理它们,并使用 OpenLineage 和 Marquez 跟踪每一条数据血缘信息——因为丢失数据就像丢失钥匙,在生产环境中只会更令人尴尬。
案例定义
在此次展示中,我们演示了如何利用血缘元数据来排除数据管道中的问题。我们的电子商务订单处理管道,尽管简单,但有效地说明了血缘元数据在操作监控和调试方面的优势。我们将模拟 Debezium 连接器中的配置更改,该更改导致订单处理作业跳过记录。使用血缘图,我们将遍历管道组件以确定问题的根本原因,并了解元数据跟踪如何实现更快的故障排除。
组件
该管道包含两个相互连接的组件
Debezium 连接器:实时捕获我们核心业务实体——订单、客户和产品——的三个 PostgreSQL 表中的更改。每个表代表我们订单履行流程中的关键部分。
Apache Flink 作业:订单处理作业,用于丰富捕获的数据流,执行连接和转换,以创建包含总重量和配送状态等已计算指标的完整配送订单。
这两个组件共享一个通用层,通过 OpenLineage 跟踪血缘元数据。
Debezium 连接器
Debezium 连接器将流式传输以下订单处理域表的更改数据
-
inventory.orders- 包含订单交易,其中包含订单 ID、日期、购买者参考、数量和产品参考等关键字段
ID=10100, Date=2025-07-18, Purchaser=1002, Quantity=10, Product=103
-
inventory.customers- 存储客户配置文件,包括 ID、姓名和电子邮件联系信息
ID=1002, Name="John Doe", Email="john@example.com"
-
inventory.products- 维护产品目录数据,包含 ID、名称、描述和重量规格
ID=103, Name="Widget", Description="Blue Widget", Weight=1.5
每个流都携带 Debezium 标准的 CDC 格式,提供有关更改性质的丰富元数据,包括操作类型、时间戳和源信息。
订单处理作业
我们演示的核心是 OrderShippingProcessor 作业,它实时丰富订单。
该作业会过滤 CDC 事件,仅处理插入、更新和读取操作,丢弃与生成配送订单无关的删除事件。然后,它从 Debezium 的 CDC 信封格式中提取相关的业务数据。接着,订单会按时间窗口进行分组,并与客户和产品流连接,创建包含总重量计算(产品重量 × 数量)、配送状态分配和处理时间戳的完整配送订单。
丰富后的配送订单将是
{
  "orderId": 10100,
  "orderDate": "2025-07-18",
  "quantity": 10,
  "productName": "Widget",
  "productDescription": "Blue Widget",
  "productWeight": 1.5,
  "totalWeight": 15.0,
  "customerName": "John Doe",
  "customerEmail": "john@example.com",
  "shippingStatus": "READY_TO_SHIP",
  "processedAt": 1721559123456
}
先决条件和设置
在开始示例之前,请确保您的环境具有必要的工具和充足的资源。
系统要求
-
Docker 和 Docker Compose 用于容器化服务
-
Maven 用于构建 Flink 作业
-
kcctl (Kafka Connect CLI) 用于连接器管理
-
jq 用于 JSON 处理和输出格式化
启动 Marquez 服务器
OpenLineage 事件可以发送到不同的 目标,在本示例中,我们将使用 Marquez 作为元数据存储和可视化工具。首先,克隆 Marquez 存储库
git clone https://github.com/MarquezProject/marquez && cd marquez启动服务器
./docker/up.sh这将启动 Marquez 的所有必需组件。
存储库设置
克隆示例存储库并导航到相应目录
git clone https://github.com/debezium/debezium-examples
cd debezium-examples/openlineage/debezium-flink
分步部署
构建 Flink 作业
首先,我们需要打包我们的订单处理作业。通过执行以下命令来构建它
mvn clean package -f flink-job/pom.xml启动演示组件
启动所有必需的服务
docker compose -f docker-compose-flink.yaml up此命令将协调以下服务的启动
-
Kafka:CDC 事件发送的消息代理
-
PostgreSQL:预填充了示例库存数据的源数据库
-
Debezium 连接器:集成了 OpenLineage 的 CDC 连接器
-
Flink 集群:用于流处理的 JobManager 和 TaskManager
网络配置
将 Marquez API 连接到演示网络以实现正常通信
docker network connect debezium-flink_default marquez-api主题准备
验证 Kafka 主题是否已正确创建
docker compose -f docker-compose-flink.yaml exec kafka /kafka/bin/kafka-topics.sh --list --bootstrap-server kafka:9092创建已处理的配送订单的输出主题
docker compose -f docker-compose-flink.yaml exec kafka /kafka/bin/kafka-topics.sh --create --bootstrap-server kafka:9092 --replication-factor 1 --partitions 1 --topic shipping-orders使用 OpenLineage 配置 Debezium
应用包含 OpenLineage 集成的 PostgreSQL 连接器配置
kcctl apply -f postgres-connector-openlineage.json此配置启用了从 PostgreSQL 数据库捕获 CDC,同时自动将血缘元数据发送到 Marquez。
有关如何使用 OpenLineage 配置 Debezium 的详细信息,请参阅我们的 文档
部署 Flink 作业
将订单处理作业提交到 Flink 集群
docker compose -f docker-compose-flink.yaml exec jobmanager bin/flink run -c io.debezium.examples.openlineage.OrderShippingProcessor flink-order-processor-1.0-SNAPSHOT.jar该作业立即开始消耗 CDC 事件并生成丰富的配送订单。
验证管道
确认正在生成和发布丰富的订单
docker compose -f docker-compose-flink.yaml exec kafka ./bin/kafka-console-consumer.sh --bootstrap-server=kafka:9092 --topic shipping-orders --from-beginning --max-messages 1 | jq您应该会看到类似以下的输出
{
  "orderId": 10001,
  "orderDate": "16816",
  "quantity": 1,
  "productName": "car battery",
  "productDescription": "12V car battery",
  "productWeight": 8.1,
  "totalWeight": 8.1,
  "customerName": "Sally Thomas",
  "customerEmail": "sally.thomas@acme.com",
  "shippingStatus": "READY_TO_SHIP",
  "processedAt": 1752139246887
}
监控和可视化
Flink Web UI
访问 https://:8081 上的 Flink Web UI,以监控作业执行情况、查看指标并调查任何处理问题。
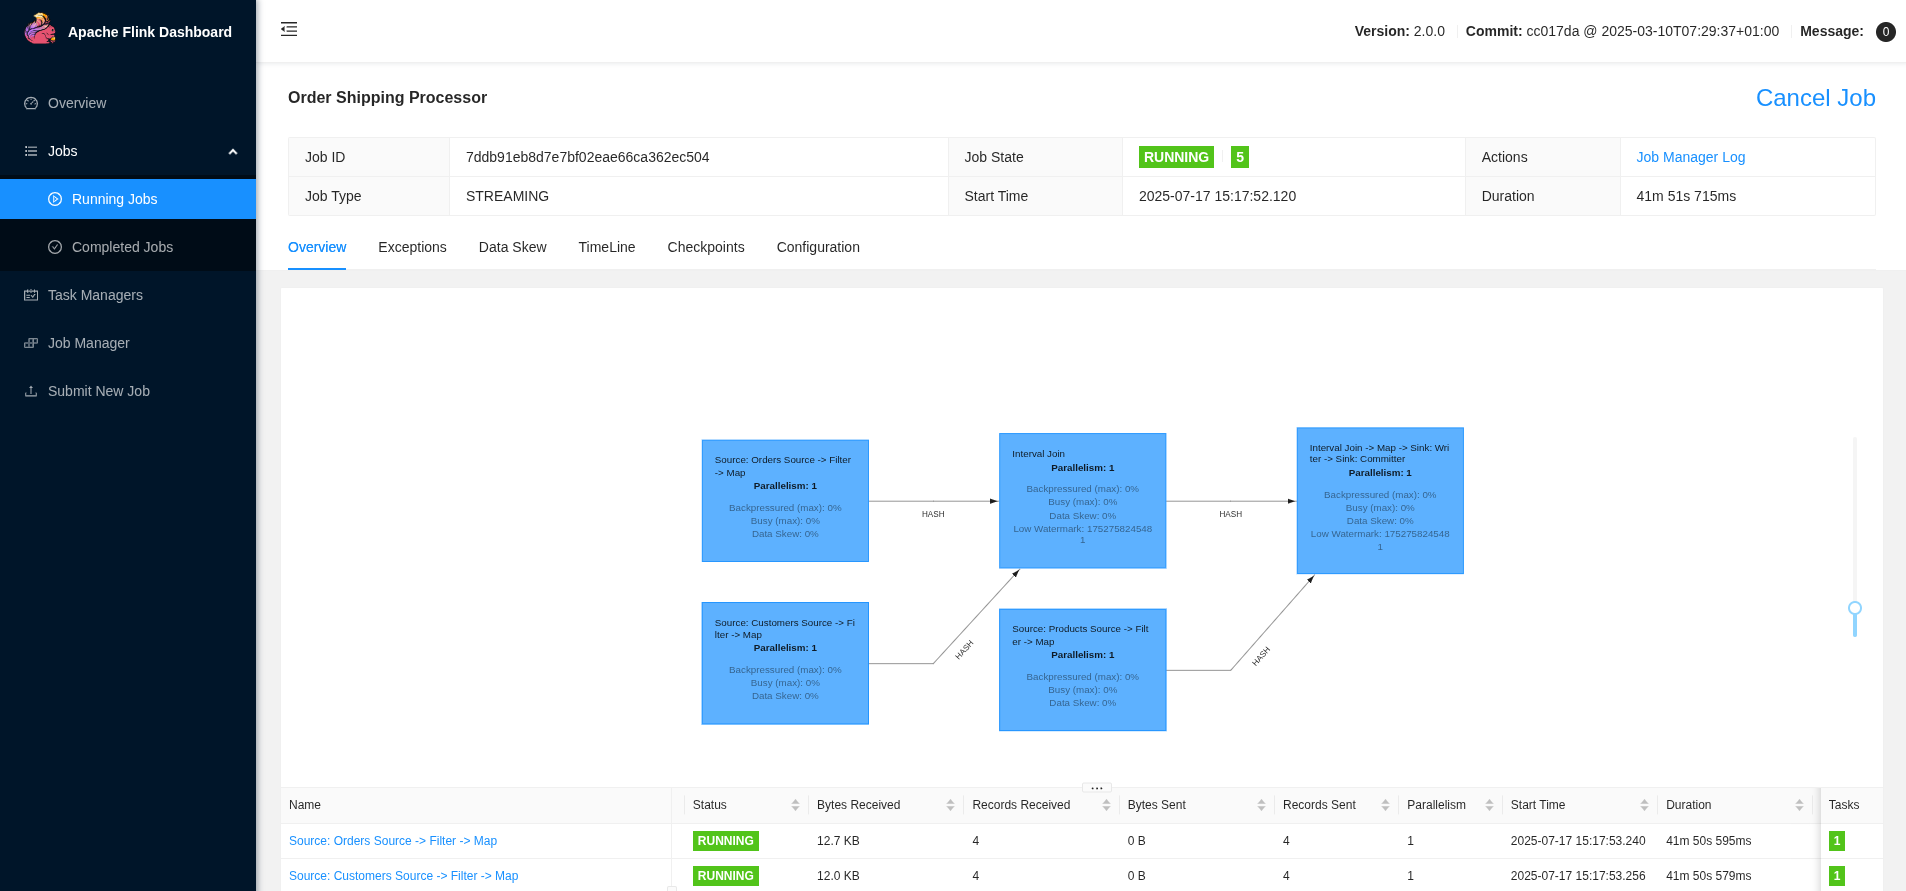
仪表板提供了以下方面的见解
-
作业执行状态和运行时指标
-
吞吐量和延迟测量
-
跨 TaskManager 的资源利用率
-
检查点和保存点信息
Marquez 血缘可视化
位于 https://:3000 的 Marquez UI 提供了全面的血缘可视化和探索功能。
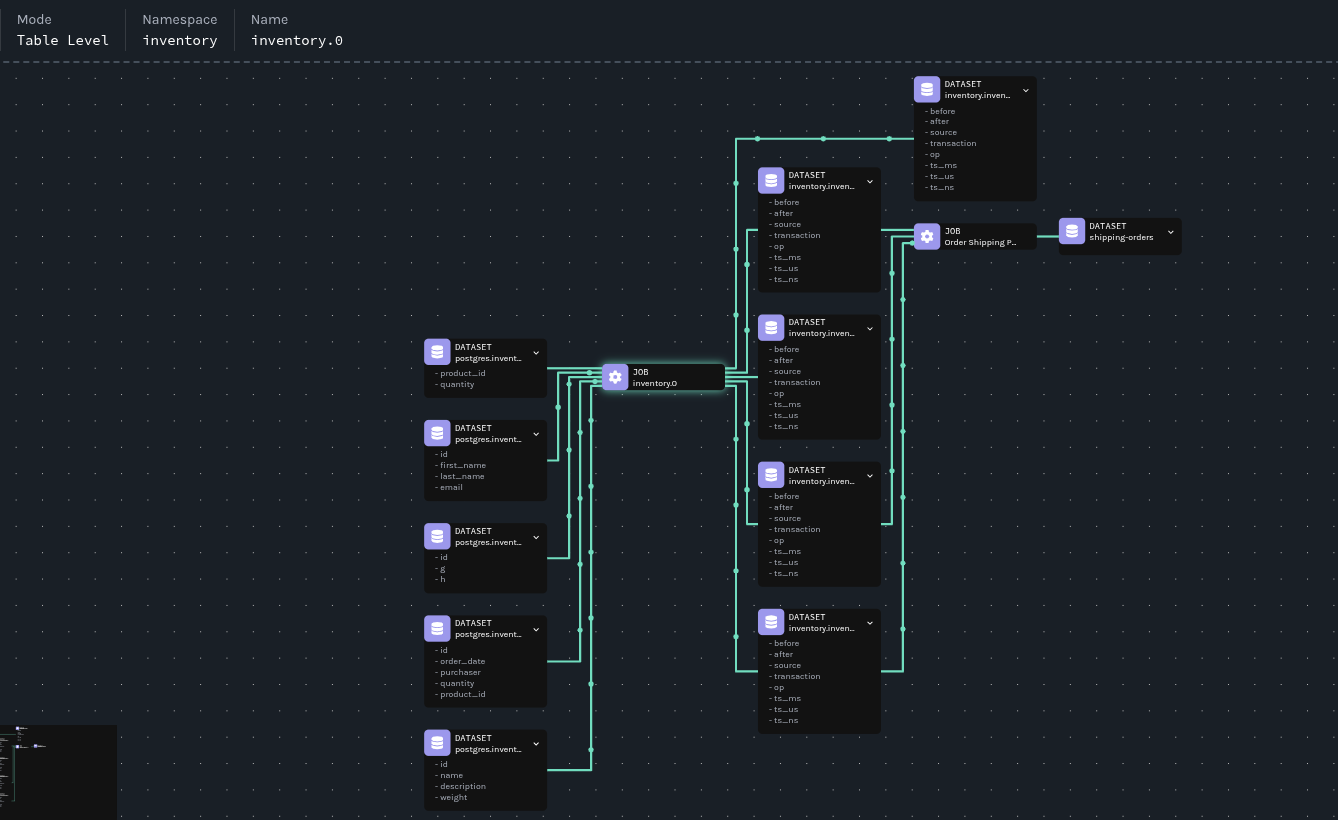
血缘图揭示了
-
数据源:PostgreSQL 表作为所有数据的来源
-
转换:Flink 作业作为处理节点,具有输入/输出关系
-
数据流:表示数据移动和转换路径的箭头
-
架构:每个数据集版本的详细架构信息
模拟破坏性更改
我们现在将模拟 Debezium 中的一项更改,该更改将导致输出数据集架构发生变化。我们将通过血缘元数据来识别和排除由架构更改引起的问题。
应用更改
我们将修改 Debezium 连接器以使用 ExtractNewRecordState 转换,该转换将消息格式从 Debezium 的标准 CDC 信封更改为扁平化结构
kcctl apply -f postgres-connector-openlineage-update.json插入一个新订单以发出具有新格式的数据更改事件
docker compose -f docker-compose-flink.yaml exec postgres psql -Upostgres -c "insert into inventory.orders values(10100, '2025-07-18', 1002, 10, 103);"观察影响
监控配送订单主题以查看效果
docker compose -f docker-compose-flink.yaml exec kafka ./bin/kafka-console-consumer.sh --bootstrap-server=kafka:9092 --topic shipping-orders --from-beginning | jq请注意,新订单(10100)未出现在输出中,这表明我们的订单处理作业尚未处理新订单。
利用血缘元数据支持进行调查
血缘图让任何人都能够轻松地查看组件关系和依赖关系,无论他们是否了解管道。订单处理作业依赖于三个数据集(inventory.inventory.orders、inventory.inventory.customers 和 inventory.inventory.products),这些数据集来自 inventory.0 作业,因此我们应该从那里开始调查。
分析作业运行
第一步是列出最近的作业运行以识别更改
curl "https://:5000/api/v1/namespaces/inventory/jobs/inventory.0/runs" | jq '.runs | map({"id": .id, "state": .state})'输出显示了多次运行,表明作业已重启
[
  {
    "id": "0197f3a3-6f97-787a-bd19-43313c9fef0a",
    "state": "RUNNING"
  },
  {
    "id": "0197f3a3-0a6a-7145-8c8b-e6040636c504",
    "state": "COMPLETED"
  }
]
现在的问题是:是什么导致了作业重启?
比较作业版本
让我们提取并存储运行 ID 以进行比较
CURRENT_RUN_ID=$(curl "https://:5000/api/v1/namespaces/inventory/jobs/inventory.0/runs" | jq -r '.runs[0].id')
PREVIOUS_RUN_ID=$(curl "https://:5000/api/v1/namespaces/inventory/jobs/inventory.0/runs" | jq -r '.runs[1].id')
这样我们就可以使用它们来比较运行之间的作业版本
diff <(curl -s "https://:5000/api/v1/jobs/runs/$CURRENT_RUN_ID" | jq -r '.jobVersion.version') \
     <(curl -s "https://:5000/api/v1/jobs/runs/$PREVIOUS_RUN_ID" | jq -r '.jobVersion.version')
1c1
< 9f65dbeb-3949-3ca0-8b15-1fc733d51c1d
---
> bd448c97-fbbe-3398-be31-f6f19b137a56我们可以立即看到存在差异。在 Marquez 中,有几个因素决定了作业版本
-
源代码位置
-
作业上下文
-
输入数据集
-
输出数据集
Marquez 使用基于这四个输入的确定性函数来创建作业版本。如果其中任何一个发生更改,就会生成新版本。
让我们比较两个作业版本,看看有什么变化。首先,我们将排除我们期望不同的字段:version、createdAt、updatedAt 和 latestRun。我们还将跳过 id 字段,因为它包含版本号。
让我们存储作业版本标识符
CURRENT_JOB_VERSION=$(curl -s "https://:5000/api/v1/jobs/runs/$CURRENT_RUN_ID" | jq -r '.jobVersion.version')
PREVIOUS_JOB_VERSION=$(curl -s "https://:5000/api/v1/jobs/runs/$PREVIOUS_RUN_ID" | jq -r '.jobVersion.version')
这样我们就可以使用它们来比较作业配置,以确定发生了哪些更改
diff <(curl -s "https://:5000/api/v1/namespaces/inventory/jobs/inventory.0/versions/$CURRENT_JOB_VERSION" | \
jq 'del(.["id", "version", "createdAt", "updatedAt", "latestRun"])') \
<(curl -s "https://:5000/api/v1/namespaces/inventory/jobs/inventory.0/versions/$PREVIOUS_JOB_VERSION" | \
jq 'del(.["id", "version", "createdAt", "updatedAt", "latestRun"])')
12,15d11
< "name": "inventory.orders"
< },
< {
< "namespace": "postgres://postgres:5432",
24a21,24
> },
> {
> "namespace": "postgres://postgres:5432",
> "name": "inventory.orders"
27a28,43
> {
> "namespace": "kafka://kafka:9092",
> "name": "inventory.inventory.geom"
> },
> {
> "namespace": "kafka://kafka:9092",
> "name": "inventory.inventory.products"
> },
> {
> "namespace": "kafka://kafka:9092",
> "name": "inventory.inventory.customers"
> },
> {
> "namespace": "kafka://kafka:9092",
> "name": "inventory.inventory.products_on_hand"
> },比较显示输出数据集已更改,这表明可能存在架构更改。我们正朝着正确的方向前进——现在我们需要深入研究。
数据集比较
现在我们检索并保存数据集版本标识符
CURRENT_DATASET_VERSION=$(curl -s "https://:5000/api/v1/jobs/runs/$CURRENT_RUN_ID" | jq -r '.outputDatasetVersions[0].datasetVersionId.version')
PREVIOUS_DATASET_VERSION=$(curl -s "https://:5000/api/v1/jobs/runs/$PREVIOUS_RUN_ID" | jq -r '.outputDatasetVersions[2].datasetVersionId.version')
这样我们就可以比较数据集架构,以确定更改的确切性质
diff <(curl -s "https://:5000/api/v1/namespaces/kafka%3A%2F%2Fkafka%3A9092/datasets/inventory.inventory.orders/versions" | \
jq --arg target_version "$CURRENT_DATASET_VERSION" '.versions[] | select(.createdByRun.outputDatasetVersions[]?.datasetVersionId.version == $target_version) | del(.["id", "version", "createdAt", "createdByRun"])') \
<(curl -s "https://:5000/api/v1/namespaces/kafka%3A%2F%2Fkafka%3A9092/datasets/inventory.inventory.orders/versions" | \
jq --arg target_version "$PREVIOUS_DATASET_VERSION" '.versions[] | select(.createdByRun.outputDatasetVersions[]?.datasetVersionId.version == $target_version) | del(.["id", "version", "createdAt", "createdByRun"])')
9,10c9,10
< "name": "id",
< "type": "INT32",
---
> "name": "before",
> "type": "STRUCT",
15,16c15,16
< "name": "order_date",
< "type": "INT32",
---
> "name": "after",
> "type": "STRUCT",
21,22c21,22
< "name": "purchaser",
< "type": "INT32",
---
> "name": "source",
> "type": "STRUCT",
27,28c27,28
< "name": "quantity",
< "type": "INT32",
---
> "name": "transaction",
> "type": "STRUCT",
33,34c33,52
< "name": "product_id",
< "type": "INT32",
---
> "name": "op",
> "type": "STRING",
> "tags": [],
> "description": null
> },
> {
> "name": "ts_ms",
> "type": "INT64",
> "tags": [],
> "description": null
> },
> {
> "name": "ts_us",
> "type": "INT64",
> "tags": [],
> "description": null
> },
> {
> "name": "ts_ns",
> "type": "INT64",
42c60
< "currentSchemaVersion": "f7874ec9-3a90-334f-8930-233a3c1bced3",
---
> "currentSchemaVersion": "5d49a53b-2116-3216-9b84-7f9850cc6f4e",
47,48c65,88
< "name": "id",
< "type": "INT32"
---
> "name": "before",
> "type": "STRUCT",
> "fields": [
> {
> "name": "id",
> "type": "INT32"
> },
> {
> "name": "order_date",
> "type": "INT32"
> },
> {
> "name": "purchaser",
> "type": "INT32"
> },
> {
> "name": "quantity",
> "type": "INT32"
> },
> {
> "name": "product_id",
> "type": "INT32"
> }
> ]
51,52c91,114
< "name": "order_date",
< "type": "INT32"
---
> "name": "after",
> "type": "STRUCT",
> "fields": [
> {
> "name": "id",
> "type": "INT32"
> },
> {
> "name": "order_date",
> "type": "INT32"
> },
> {
> "name": "purchaser",
> "type": "INT32"
> },
> {
> "name": "quantity",
> "type": "INT32"
> },
> {
> "name": "product_id",
> "type": "INT32"
> }
> ]
55,56c117,176
< "name": "purchaser",
< "type": "INT32"
---
> "name": "source",
> "type": "STRUCT",
> "fields": [
> {
> "name": "version",
> "type": "STRING"
> },
> {
> "name": "connector",
> "type": "STRING"
> },
> {
> "name": "name",
> "type": "STRING"
> },
> {
> "name": "ts_ms",
> "type": "INT64"
> },
> {
> "name": "snapshot",
> "type": "STRING"
> },
> {
> "name": "db",
> "type": "STRING"
> },
> {
> "name": "sequence",
> "type": "STRING"
> },
> {
> "name": "ts_us",
> "type": "INT64"
> },
> {
> "name": "ts_ns",
> "type": "INT64"
> },
> {
> "name": "schema",
> "type": "STRING"
> },
> {
> "name": "table",
> "type": "STRING"
> },
> {
> "name": "txId",
> "type": "INT64"
> },
> {
> "name": "lsn",
> "type": "INT64"
> },
> {
> "name": "xmin",
> "type": "INT64"
> }
> ]
59,60c179,194
< "name": "quantity",
< "type": "INT32"
---
> "name": "transaction",
> "type": "STRUCT",
> "fields": [
> {
> "name": "id",
> "type": "STRING"
> },
> {
> "name": "total_order",
> "type": "INT64"
> },
> {
> "name": "data_collection_order",
> "type": "INT64"
> }
> ]
63,64c197,210
< "name": "product_id",
< "type": "INT32"
---
> "name": "op",
> "type": "STRING"
> },
> {
> "name": "ts_ms",
> "type": "INT64"
> },
> {
> "name": "ts_us",
> "type": "INT64"
> },
> {
> "name": "ts_ns",
> "type": "INT64"
74a221,225
> },
> "symlinks": {
> "_producer": "https://github.com/OpenLineage/OpenLineage/tree/1.34.0/integration/flink",
> "_schemaURL": "https://openlineage.io/spec/facets/1-0-1/SymlinksDatasetFacet.json#/$defs/SymlinksDatasetFacet",
> "identifiers": []我们已确认发生了架构更改。现在我们需要确定是什么触发了它。
根本原因识别
最后一步是确定导致架构更改的配置更改。比较创建不同数据集版本的作业版本
diff <(curl -s "https://:5000/api/v1/namespaces/kafka%3A%2F%2Fkafka%3A9092/datasets/inventory.inventory.orders/versions" | \
jq --arg target_version "$CURRENT_DATASET_VERSION" '.versions[] | select(.createdByRun.outputDatasetVersions[]?.datasetVersionId.version == $target_version) | .createdByRun.jobVersion') \
<(curl -s "https://:5000/api/v1/namespaces/kafka%3A%2F%2Fkafka%3A9092/datasets/inventory.inventory.orders/versions" | \
jq --arg target_version "$PREVIOUS_DATASET_VERSION" '.versions[] | select(.createdByRun.outputDatasetVersions[]?.datasetVersionId.version == $target_version) | .createdByRun.jobVersion')
< "version": "9f65dbeb-3949-3ca0-8b15-1fc733d51c1d"
---
> "version": "bd448c97-fbbe-3398-be31-f6f19b137a56"
```因此,我们记下作业版本 ID,并使用它们来检查发生了哪些变化
diff <(curl -s "https://:5000/api/v1/namespaces/inventory/jobs/inventory.0" | \
jq --arg target_version "9f65dbeb-3949-3ca0-8b15-1fc733d51c1d" '.latestRuns[] | select(.jobVersion.version == $target_version) | del(.["id", "version", "createdAt", "updatedAt", "latestRun"])') \
<(curl -s "https://:5000/api/v1/namespaces/inventory/jobs/inventory.0" | \
jq --arg target_version "bd448c97-fbbe-3398-be31-f6f19b137a56" '.latestRuns[] | select(.jobVersion.version == $target_version) | del(.["id", "version", "createdAt", "updatedAt", "latestRun"])')
4,7c4,7
< "state": "RUNNING",
< "startedAt": "2025-07-10T09:21:12.985879Z",
< "endedAt": null,
< "durationMs": null,
---
> "state": "COMPLETED",
> "startedAt": "2025-07-10T09:20:39.231621Z",
> "endedAt": "2025-07-10T09:21:03.860Z",
> "durationMs": 24629,
12c12
< "version": "9f65dbeb-3949-3ca0-8b15-1fc733d51c1d"
---
> "version": "bd448c97-fbbe-3398-be31-f6f19b137a56"
59a60,75
> "name": "inventory.inventory.customers",
> "version": "46b86c1e-162d-3155-aecc-6bb6f8f35128"
> },
> "facets": {}
> },
> {
> "datasetVersionId": {
> "namespace": "kafka://kafka:9092",
> "name": "inventory.inventory.geom",
> "version": "80413cf4-dce5-3fec-8e86-322b6a35c8df"
> },
> "facets": {}
> },
> {
> "datasetVersionId": {
> "namespace": "kafka://kafka:9092",
61c77,93
< "version": "5bc1a4b7-4568-37cf-880b-507139865500"
---
> "version": "2c23ea5c-8349-3484-afe4-f70ed6c283d3"
> },
> "facets": {}
> },
> {
> "datasetVersionId": {
> "namespace": "kafka://kafka:9092",
> "name": "inventory.inventory.products",
> "version": "3a9f3ec2-5a42-3bad-a658-9351b3a45311"
> },
> "facets": {}
> },
> {
> "datasetVersionId": {
> "namespace": "kafka://kafka:9092",
> "name": "inventory.inventory.products_on_hand",
> "version": "c5a10775-a191-3e8f-a548-3aaab54defcf"
85c117
< "transforms=unwrap,openlineage",
---
> "transforms=openlineage",
95d126
< "transforms.unwrap.type=io.debezium.transforms.ExtractNewRecordState",查看最后一部分,我们可以看到已添加 io.debezium.transforms.ExtractNewRecordState。亲爱的华生,这很简单——这就是我们的麻烦制造者!
资源清理
完成演示后,请清理所有资源
docker compose -f docker-compose-flink.yaml down
docker rmi debezium/flink-job
cd marquez && .docker/down.sh
docker volume ls | grep marquez | awk '{print $2}' | xargs docker volume rm
结论
此演示展示了现在 Debezium 还发出血缘事件,数据血缘变得更加强大,从而提供了更完整的图景,并使所有用户能够全面了解管道的可观测性。
最引人注目的优点之一是 OpenLineage producer 如何自动捕获有关数据源、转换和输出的全面元数据。这在后台无缝进行,不需要开发团队进行手动检测或代码修改。系统会在操作自然展开时,悄无声息地构建数据移动和转换的完整图景。
当不可避免地发生更改时,数据血缘可以提供对演进过程的详细可见性。团队无需费力去了解何时何地发生了什么变化,而是可以快速查看确切的修改、发生时间以及受影响的下游系统。收集的丰富元数据能够快速进行根本原因分析,而这些分析如果不这样做,将需要大量的侦探工作。曾经需要数小时才能解决的问题,现在可以在几分钟内解决,正如我们在案例研究中所示。
除了故障排除之外,这种集成还提供了操作透明性,使团队能够完全理解其复杂的流式处理架构。对数据流的完全可见性能够就系统更改做出更好的决策,并帮助团队在潜在影响发生之前进行预测。随着数据系统的复杂性不断增加,这种能力变得至关重要,全面的血缘跟踪可以区分快速问题解决和长时间系统停机。
准备好开始了吗?查看 Debezium OpenLineage 文档,在您自己的管道中启用此强大的集成!
关于 Debezium
Debezium 是一个开源的分布式平台,可以将现有数据库转变为事件流,使应用程序能够几乎即时地看到并响应数据库中已提交的每个行级更改。Debezium 构建在 Kafka 之上,并提供了 Kafka Connect 兼容的连接器,用于监控特定的数据库管理系统。Debezium 将数据更改的历史记录在 Kafka 日志中,这样您的应用程序可以随时停止和重新启动,并可以轻松地消费在未运行时错过的所有事件,确保所有事件都被正确且完整地处理。Debezium 在 Apache 许可证 2.0 下是 开源 的。