
Debezium 从数据库流式传输的变更事件(用开发者的话来说)是强类型的。这意味着事件使用者应该了解事件中传递的数据类型。传递消息类型数据的这个问题可以通过多种方式解决
-
消息结构在带外传递给消费者,消费者可以处理其中存储的数据
-
消息包含元数据(schema),该元数据嵌入在消息中
-
消息包含一个指向包含关联元数据的注册表的引用
Apache Kafka 著名的 JsonConverter 是第一种情况的一个例子。它可以两种模式下运行 - 带模式和不带模式。当配置为不带模式工作时,它会生成一个纯 JSON 消息,消费者需要预先知道每个字段的类型,或者它需要执行启发式规则来“猜测”并将值映射到数据类型。虽然这种方法非常灵活,但它可能在更高级的情况下失败,例如,编码为字符串的时间或其他的语义类型。此外,与类型相关的约束通常会丢失。
以下是此类消息的一个示例
{
  "before": null,
  "after": {
    "id": 1001,
    "first_name": "Sally",
    "last_name": "Thomas",
    "email": "sally.thomas@acme.com"
  },
  "source": {
    "version": "1.1.0.Final",
    "connector": "mysql",
    "name": "dbserver1",
    "ts_ms": 0,
    "snapshot": "true",
    "db": "inventory",
    "table": "customers",
    "server_id": 0,
    "gtid": null,
    "file": "mysql-bin.000003",
    "pos": 154,
    "row": 0,
    "thread": null,
    "query": null
  },
  "op": "c",
  "ts_ms": 1586331101491,
  "transaction": null
}
请注意,除了 JSON 的基本类型系统之外,没有其他类型信息。例如,消费者无法从事件本身推断出数字字段 id 的长度。
第二种情况的例子同样是 JsonConverter。通过其 schemas.enable 选项,JSON 消息将包含两部分 - schema 和 payload。payload 部分与上一情况完全相同;schema 部分包含消息、其字段、字段类型和相关的类型约束的描述。这使得消费者能够以类型安全的方式处理消息。这种方法的缺点是消息的大小显著增加,因为 schema 是一个相当大的对象。由于 schema 的更改通常很少(您多久更改一次数据库表列的定义?),将 schema 添加到每个事件都会带来显著的开销。
以下带有 schema 的消息示例清楚地表明,schema 本身可能比 payload 大得多,使用效率不高
{
  "schema": {
    "type": "struct",
    "fields": [
      {
        "type": "struct",
        "fields": [
          {
            "type": "int32",
            "optional": false,
            "field": "id"
          },
          {
            "type": "string",
            "optional": false,
            "field": "first_name"
          },
          {
            "type": "string",
            "optional": false,
            "field": "last_name"
          },
          {
            "type": "string",
            "optional": false,
            "field": "email"
          }
        ],
        "optional": true,
        "name": "dbserver1.inventory.customers.Value",
        "field": "before"
      },
      {
        "type": "struct",
        "fields": [
          {
            "type": "int32",
            "optional": false,
            "field": "id"
          },
          {
            "type": "string",
            "optional": false,
            "field": "first_name"
          },
          {
            "type": "string",
            "optional": false,
            "field": "last_name"
          },
          {
            "type": "string",
            "optional": false,
            "field": "email"
          }
        ],
        "optional": true,
        "name": "dbserver1.inventory.customers.Value",
        "field": "after"
      },
      {
        "type": "struct",
        "fields": [
          {
            "type": "string",
            "optional": false,
            "field": "version"
          },
          {
            "type": "string",
            "optional": false,
            "field": "connector"
          },
          {
            "type": "string",
            "optional": false,
            "field": "name"
          },
          {
            "type": "int64",
            "optional": false,
            "field": "ts_ms"
          },
          {
            "type": "string",
            "optional": true,
            "name": "io.debezium.data.Enum",
            "version": 1,
            "parameters": {
              "allowed": "true,last,false"
            },
            "default": "false",
            "field": "snapshot"
          },
          {
            "type": "string",
            "optional": false,
            "field": "db"
          },
          {
            "type": "string",
            "optional": true,
            "field": "table"
          },
          {
            "type": "int64",
            "optional": false,
            "field": "server_id"
          },
          {
            "type": "string",
            "optional": true,
            "field": "gtid"
          },
          {
            "type": "string",
            "optional": false,
            "field": "file"
          },
          {
            "type": "int64",
            "optional": false,
            "field": "pos"
          },
          {
            "type": "int32",
            "optional": false,
            "field": "row"
          },
          {
            "type": "int64",
            "optional": true,
            "field": "thread"
          },
          {
            "type": "string",
            "optional": true,
            "field": "query"
          }
        ],
        "optional": false,
        "name": "io.debezium.connector.mysql.Source",
        "field": "source"
      },
      {
        "type": "string",
        "optional": false,
        "field": "op"
      },
      {
        "type": "int64",
        "optional": true,
        "field": "ts_ms"
      },
      {
        "type": "struct",
        "fields": [
          {
            "type": "string",
            "optional": false,
            "field": "id"
          },
          {
            "type": "int64",
            "optional": false,
            "field": "total_order"
          },
          {
            "type": "int64",
            "optional": false,
            "field": "data_collection_order"
          }
        ],
        "optional": true,
        "field": "transaction"
      }
    ],
    "optional": false,
    "name": "dbserver1.inventory.customers.Envelope"
  },
  "payload": {
    "before": null,
    "after": {
      "id": 1001,
      "first_name": "Sally",
      "last_name": "Thomas",
      "email": "sally.thomas@acme.com"
    },
    "source": {
      "version": "1.1.0.Final",
      "connector": "mysql",
      "name": "dbserver1",
      "ts_ms": 0,
      "snapshot": "true",
      "db": "inventory",
      "table": "customers",
      "server_id": 0,
      "gtid": null,
      "file": "mysql-bin.000003",
      "pos": 154,
      "row": 0,
      "thread": null,
      "query": null
    },
    "op": "c",
    "ts_ms": 1586331101491,
    "transaction": null
  }
}
注册表
然后是第三种方法,它结合了前两种方法的优点,同时消除了它们的缺点,代价是引入了一个新组件——注册表——它存储和版本化消息 schema。
有多种 schema 注册表实现可用;在接下来的内容中,我们将重点关注 Apicurio Registry,这是一个开源(Apache 许可证 2.0)的 API 和 schema 注册表。该项目不仅提供了注册表本身,还提供了客户端库,并通过序列化器和转换器与 Apache Kafka 和 Kafka Connect 紧密集成。
Apicurio 使 Debezium 和消费者能够交换消息,这些消息的 schema 存储在注册表中,并且消息中只包含对 schema 的引用。随着捕获的源表结构以及因此的消息 schema 的演变,注册表也会创建 schema 的新版本,因此不仅当前而且历史 schema 也可用。
Apicurio 开箱即用地提供了多种序列化格式
-
支持外部化 schema 的 JSON
每个序列化器和反序列化器都知道如何自动与 Apicurio API 交互,因此消费者可以将其作为实现细节进行隔离。唯一必要的信息是注册表的位置。
Apicurio 还为 IBM 和 Confluent 的 schema 注册表提供了 API 兼容层。这是一个非常有用的功能,因为它允许使用 kafkacat 等第三方工具,即使它们不知道 Apicurio 的原生 API。
JSON Converter
在 Debezium 示例仓库中,有一个基于 Docker Compose 的示例,它与标准的 Debezium 教程示例设置并排部署了 Apicurio 注册表。
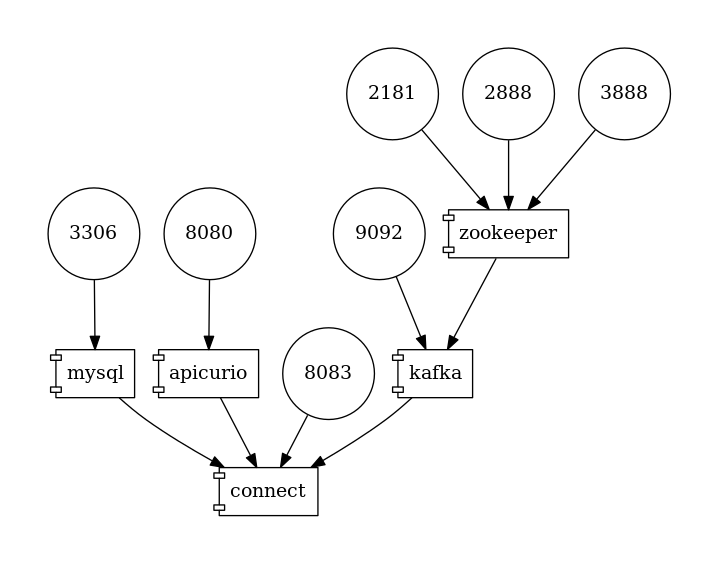
图 1. 部署拓扑
要跟随示例,您需要克隆 Debezium 示例仓库。
| 自 Debezium 1.2 起,Debezium 容器镜像已随 Apicurio 转换器支持一起提供。 您可以通过使用版本 >=1.2 的 |
$ cd tutorial
$ export DEBZIUM_VERSION=1.1

# Start the deployment
$ docker-compose -f docker-compose-mysql-apicurio.yaml up -d --build

# Start the connector
curl -i -X POST -H "Accept:application/json" \
    -H  "Content-Type:application/json" \
    https://:8083/connectors/ -d @register-mysql-apicurio-converter-json.json

# Read content of the first message
$ docker run --rm --tty \
    --network tutorial_default debezium/tooling bash \
    -c 'kafkacat -b kafka:9092 -C -o beginning -q -t dbserver1.inventory.customers -c 1 | jq .'
生成的消息应如下所示
{
  "schemaId": 48,
  "payload": {
    "before": null,
    "after": {
      "id": 1001,
      "first_name": "Sally",
      "last_name": "Thomas",
      "email": "sally.thomas@acme.com"
    },
    "source": {
      "version": "1.1.0.Final",
      "connector": "mysql",
      "name": "dbserver1",
      "ts_ms": 0,
      "snapshot": "true",
      "db": "inventory",
      "table": "customers",
      "server_id": 0,
      "gtid": null,
      "file": "mysql-bin.000003",
      "pos": 154,
      "row": 0,
      "thread": null,
      "query": null
    },
    "op": "c",
    "ts_ms": 1586334283147,
    "transaction": null
  }
}
JSON 消息包含完整的 payload,同时包含对 ID 为 48 的 schema 的引用。可以通过 id 或使用 Debezium 文档定义的 schema 符号名称从注册表中查询 schema。在这种情况下,两个命令
$ docker run --rm --tty \
    --network tutorial_default \
    debezium/tooling bash -c 'http http://apicurio:8080/ids/64 | jq .'

$ docker run --rm --tty \
    --network tutorial_default \
    debezium/tooling bash -c 'http http://apicurio:8080/artifacts/dbserver1.inventory.customers-value | jq .'
产生相同的 schema 描述
{
  "type": "struct",
  "fields": [
    {
      "type": "struct",
      "fields": [
        {
          "type": "int32",
          "optional": false,
          "field": "id"
        },
        {
          "type": "string",
          "optional": false,
          "field": "first_name"
        },
        {
          "type": "string",
          "optional": false,
          "field": "last_name"
        },
        {
          "type": "string",
          "optional": false,
          "field": "email"
        }
      ],
      "optional": true,
      "name": "dbserver1.inventory.customers.Value",
      "field": "before"
    },
...
  ],
  "optional": false,
  "name": "dbserver1.inventory.customers.Envelope"
}
这与我们在之前的“带有 schema 的 JSON”示例中看到的相同。
连接器注册请求与之前的请求相比,只多了几行
...
"key.converter": "io.apicurio.registry.utils.converter.ExtJsonConverter", (1)
"key.converter.apicurio.registry.url": "http://apicurio:8080", (2)
"key.converter.apicurio.registry.global-id":
    "io.apicurio.registry.utils.serde.strategy.GetOrCreateIdStrategy", (3)

"value.converter": "io.apicurio.registry.utils.converter.ExtJsonConverter", (1)
"value.converter.apicurio.registry.url": "http://apicurio:8080", (2)
"value.converter.apicurio.registry.global-id":
    "io.apicurio.registry.utils.serde.strategy.GetOrCreateIdStrategy" (3)
...| 1 | Apicurio JSON 转换器同时用作键和值转换器 |
| 2 | Apicurio 注册表端点 |
| 3 | 此设置确保可以自动注册 schema ID,这是 Debezium 部署中的典型设置 |
Avro Converter
到目前为止,我们仅演示了将消息序列化为 JSON 格式。虽然使用带有注册表的 JSON 格式有很多优点,例如易于人类阅读,但它仍然不是非常节省空间。
为了真正只传输数据而没有任何显着的开销,使用像 Avro 格式这样的二进制格式序列化很有用。在这种情况下,我们将只打包数据,而不包含任何字段名和其他仪式,并且消息将再次包含一个指向存储在注册表中的 schema 的引用。
让我们看看如何轻松地将 Avro 序列化与 Apicurio 的 Avro 转换器一起使用。
# Tear down the previous deployment
$ docker-compose -f docker-compose-mysql-apicurio.yaml down

# Start the deployment
$ docker-compose -f docker-compose-mysql-apicurio.yaml up -d --build

# Start the connector
curl -i -X POST -H "Accept:application/json" \
    -H  "Content-Type:application/json" \
    https://:8083/connectors/ \
    -d @register-mysql-apicurio-converter-avro.json
我们可以使用 schema 名称查询注册表
$ docker run --rm --tty \
    --network tutorial_default \
    debezium/tooling \
    bash -c 'http http://apicurio:8080/artifacts/dbserver1.inventory.customers-value | jq .'
生成的 schema 描述与之前的略有不同,因为它具有 Avro 的风格
{
  "type": "record",
  "name": "Envelope",
  "namespace": "dbserver1.inventory.customers",
  "fields": [
    {
      "name": "before",
      "type": [
        "null",
        {
          "type": "record",
          "name": "Value",
          "fields": [
            {
              "name": "id",
              "type": "int"
            },
            {
              "name": "first_name",
              "type": "string"
            },
            {
              "name": "last_name",
              "type": "string"
            },
            {
              "name": "email",
              "type": "string"
            }
          ],
          "connect.name": "dbserver1.inventory.customers.Value"
        }
      ],
      "default": null
    },
    {
      "name": "after",
      "type": [
        "null",
        "Value"
      ],
      "default": null
    },
...
  ],
  "connect.name": "dbserver1.inventory.customers.Envelope"
}
连接器注册请求也与标准请求在少数几行上有所不同
...
"key.converter": "io.apicurio.registry.utils.converter.AvroConverter", (1)
"key.converter.apicurio.registry.url": "http://apicurio:8080", (2)
"key.converter.apicurio.registry.converter.serializer":
    "io.apicurio.registry.utils.serde.AvroKafkaSerializer", (3)
"key.converter.apicurio.registry.converter.deserializer":
    "io.apicurio.registry.utils.serde.AvroKafkaDeserializer", (3)
"key.converter.apicurio.registry.global-id":
    "io.apicurio.registry.utils.serde.strategy.GetOrCreateIdStrategy", (4)

"value.converter": "io.apicurio.registry.utils.converter.AvroConverter", (1)
"value.converter.apicurio.registry.url": "http://apicurio:8080", (2)
"value.converter.apicurio.registry.converter.serializer":
    "io.apicurio.registry.utils.serde.AvroKafkaSerializer", (3)
"value.converter.apicurio.registry.converter.deserializer":
    "io.apicurio.registry.utils.serde.AvroKafkaDeserializer", (3)
"value.converter.apicurio.registry.global-id":
    "io.apicurio.registry.utils.serde.strategy.GetOrCreateIdStrategy", (4)
...| 1 | Apicurio Avro 转换器同时用作键和值转换器 |
| 2 | Apicurio 注册表端点 |
| 3 | 规定了转换器应使用哪个序列化器和反序列化器 |
| 4 | 此设置确保可以自动注册 schema ID,这是 Debezium 部署中的典型设置 |
为了演示 sink 端的消息消费,我们可以使用 Kafka Connect Elasticsearch 连接器。sink 配置也将仅通过转换器配置进行扩展,并且 sink 连接器可以消费支持 Avro 的主题,而无需其他任何更改。
{
  "name": "elastic-sink",
  "config": {
    "connector.class": "io.confluent.connect.elasticsearch.ElasticsearchSinkConnector",
    "tasks.max": "1",
    "topics": "customers",
    "connection.url": "http://elastic:9200",
    "transforms": "unwrap,key",
    "transforms.unwrap.type": "io.debezium.transforms.ExtractNewRecordState",
    "transforms.unwrap.drop.tombstones": "false",
    "transforms.key.type": "org.apache.kafka.connect.transforms.ExtractField$Key",
    "transforms.key.field": "id",
    "key.ignore": "false",
    "type.name": "customer",
    "behavior.on.null.values": "delete",

    "key.converter": "io.apicurio.registry.utils.converter.AvroConverter",
    "key.converter.apicurio.registry.url": "http://apicurio:8080",
    "key.converter.apicurio.registry.converter.serializer":
        "io.apicurio.registry.utils.serde.AvroKafkaSerializer",
    "key.converter.apicurio.registry.converter.deserializer":
        "io.apicurio.registry.utils.serde.AvroKafkaDeserializer",
    "key.converter.apicurio.registry.global-id":
        "io.apicurio.registry.utils.serde.strategy.GetOrCreateIdStrategy",

    "value.converter": "io.apicurio.registry.utils.converter.AvroConverter",
    "value.converter.apicurio.registry.url": "http://apicurio:8080",
    "value.converter.apicurio.registry.converter.serializer":
        "io.apicurio.registry.utils.serde.AvroKafkaSerializer",
    "value.converter.apicurio.registry.converter.deserializer":
        "io.apicurio.registry.utils.serde.AvroKafkaDeserializer",
    "value.converter.apicurio.registry.global-id":
        "io.apicurio.registry.utils.serde.strategy.GetOrCreateIdStrategy",
  }
}
结论
在本文中,我们讨论了多种消息/schema 关联方法。Apicurio 注册表被提出作为 schema 存储和版本化的解决方案,并且我们演示了 Apicurio 如何与 Debezium 连接器集成,以高效地将带有 schema 的消息传递给消费者。
您可以在 GitHub 上的 Debezium 示例仓库的 教程项目中找到一个完整的示例,用于将 Debezium 连接器与 Apicurio 注册表一起使用。
关于 Debezium
Debezium 是一个开源的分布式平台,可以将现有数据库转变为事件流,使应用程序能够几乎即时地看到并响应数据库中已提交的每个行级更改。Debezium 构建在 Kafka 之上,并提供了 Kafka Connect 兼容的连接器,用于监控特定的数据库管理系统。Debezium 将数据更改的历史记录在 Kafka 日志中,这样您的应用程序可以随时停止和重新启动,并可以轻松地消费在未运行时错过的所有事件,确保所有事件都被正确且完整地处理。Debezium 在 Apache 许可证 2.0 下是 开源 的。